Tuesday, August 31, 2010

simple&easy


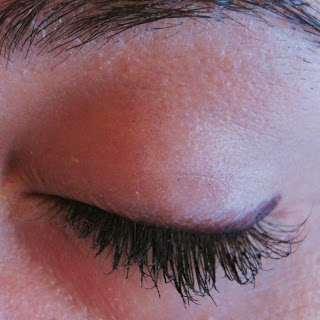
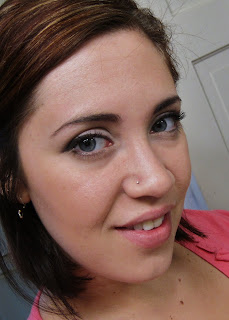
This look is absolutely perfect for everyday, but can also be bumped up for night time wear by simply darkening the crease or adding a colored liner. It is also very versatile within its day time look. Depending on your personal preference, you can make this look at light or dark as you desire; use this tutorial as a general guideline of where to place each shadow.

..................................lightest
-...................inner corner
..................................darkest -.................. outer corner
.............................................................................crease
..................................medium/light -.......lid
..................................natural/skin tone - brow bone
..................................highlight -................inner corner
..............................................................................highest point beneath eyebrow


how to get this look

step one:
Prime entire eyelid.
step two:
Line the upper lash line from inner to outer corner with
NYX jumbo eye pencil in Milk. Pat line with finger to soften.
step three:
Using an overall shadow or blending brush, apply a light cream
tone over the line of Milk, and blend it upwards into the crease.
Make sure this color does not go much past the crease, if at all.
step four:
Apply a very light brown to the crease with a rounded crease brush.
Make sure to completely blend the shadow into the light cream on
your lid. I also highly suggest bringing this color onto the outer lash line.
step four:
With a small shadow or smudger brush, apply a line
of chocolate brown into the deepest part of your
crease 2/3 of the way into your eye from the outer corner.
step five:
Buff out this line of chocolate brown with either a fluffy brush or
rounded crease brush. Make sure to keep this shadow within
the crease area. It should not cover or pass the light brown you
previously applied to the crease.
step six:
(optional)
Line upper lash line thinly with a dark brown.
step seven:
Mascara and done!


That's all for now. Stay beautiful!

Monday, August 30, 2010

what's in my (makeup) bag...

... or really, what's on my (makeup) shelves


This is how I have my makeup set up on a daily basis. I used to use a plastic desk organizer from target with 3 drawers, a covered top, and two separated cups on top. It worked well, but I grew out of it, and it wasn't so efficient all the time. After I moved houses, this is what I came up with.

If you can't tell, my makeup is sitting on my dresser and I have installed two shelves from target. I also placed three removable hooks to the right of the corner shelves to hang my necklaces. Prior to this, they were bunched up in a small lock box where I couldn't see what I did or did not have. To store brushes, liners, and miscellaneous products that cannot stand on their own, I have refurbished old glass wear, much of which once held candles. I also keep a plastic cup on my dresser for small trash items such as q-tips or face towelettes. This helps keep mess down and cut down clean up time on rushed mornings.


This is an organizer that came in a stackable container from target. (I looked for it on their website and had no such luck.) As you can see, I use this to store bobby pins, hair clips, q-tips, and other random makeup products that needed a home. I don't know about you, but bobby pins are prized possessions, and somehow always get lost. Something like this helps prevent all of them from disappearing, that is if you're putting them back here every time you're done using them. ;-)


Revlon Grow Luscious Mascara
Remington Mini Personal Trimmer
- this is great to trimming your brows between waxings.
Mary Kay Oil Mattifier
Too Faced Shadow Insurance
Clinique Acne Solutions Spot Healing Gel
a nail file
tweezers
a comb


This cute little container was either originally a candle or shot glass, I don't remember, but either work extremely well. So, if you were trying to figure out what to do with all those shot glasses, here's one idea!

Most of my liners are from NYX. I have purchased many of them from a beauty store in Los Gatos called Beauty Avenue, but you can also purchase them online on the NYX website or cherryculture.com.

My favorites include...
the Jumbo Eyepencil in Milk,
Eyepencil in White Pearl (918) or Pure White (03),
Y2K (826) which is a purply maroon color,
and Charcoal (912).

I also highly suggest owning a dark brown and a black eyeliner.

If you're daring enough, try a liquid liner! The best way to start is a felt tip. It looks very similar to a sharpie marker and goes on very easily. I personally own Milani Eye Tech Liquid Eyeliner. I purchased mine from cherryculture.com and you can see a close up of the actual liner in my haul blog about half way down the page. There are so many different types of liquid liners, this is just a great style to start with. That's a whole other blog in itself, keep your eyes open for it ;-)

It's also really fun to have a glitter liner. I suggest a simple iridescent, uncolored one because you can place it over any colored shadow or liner, making it more versatile. I own NYX Candy Glitter Liner in Crystal.


Brushes! So, I'm not going to go into great detail on this topic. If you want more details about what brushes to buy, and each of their specific uses, click here to read up on my "brushes galore" blog post.


On my first shelve are the products I probably use the most.

Stila One Step Makeup
Bare Escentuals Buxom Gel Eyeliner
BH Cosmetics 120 Palette 2nd edition
Sephora Setting Mist
a blush palette
a makeup wedge
a home made magnetic palette for my miscellaneous shadows.


Finally, we've got lotions, sunscreen, deodorant, makeup remover, and toner. Nothing too exciting, but probably the most important items you can own for your face. Whether or not you wear makeup, it's soooo important you clean your face at least twice a day and moisturize, moisturize, moisturize; doing so will help keep your skin looking young and vibrant much longer. Check out my "cheap and easy" blog post for my skin care routine.

I also have a drawer in my dresser directly below all my makeup to keep the items I don't use as regularly. This includes most hair tools and products, face towelettes, rarely used shadows, eyelashes, etc. It's all close enough to quickly access, but not in my way.

That's all for now. Stay beautiful!

PS. If you're wondering why I have a picture of myself next to my second shelve on my mirror, it's for motivational purposes. First of all, it was taken on a really great day, with amazing people, and it's always great to surround yourself with those kinds of memories. More importantly, however, it's meant as inspiration to stay healthy. This picture was taken when I was most healthy and I'd like to get back to that. I'm on my way, but certainly not there yet! A lot of girls look at pictures of celebrities and models, but it's so much more concrete when it's a realistic picture of yourself. It makes the goal so much more attainable.

Saturday, August 28, 2010

questions for you!

Ok, so, yeaaa... hehe. I have some questions for you. If you could answer in a comment, I'LL LOVE YOU FOREVER AND EVER! yay! =)

1. Should I do videos? (I think I already know the answer to this one, but I'll ask it for good measure anyhow.) Should I do them on Youtube or just on here? What do you think?

2. How much would you pay for me to do your makeup? Hair? I'm thinking about diving into starting a small business to do hair and makeup, but especially makeup, for special events, like proms, etc
.

3. What about a vlog? Would you be interested in one? Of course it'd be pretty makeup and money saving oriented, but a lot about my life too. I dunno, what do you think? Is it even worth my time?

4. Anything else you think I should be doing to make this blog more interesting or to add to my "brand".

Ummmm.. so, yeah! I do this just as much for you, my readers, as myself! So let me know what you think, and what you want to see. Ok, byeeee! Stay beautiful!

enter to win!

Soooooo.... one of my bestest friends in the whole entire world has started a vlog on youtube all about FASHION! YAY! She's extremely knowledgeable, adorable, and just all around amazing. She went to FIDM and now works for Anthropology.

In honor of starting her youtube channel, Shabby Apple has offered to give away this adorable dress! (That's a 76.00 dress for FREE!!) All you have to do is subscribe to Ilyssa's blog, the Style Edge, and comment this video with videos you'd like to see from the Style Edge.

Check out her blog, the Style Edge, too!


That's all for now. Stay beautiful!

Thursday, August 26, 2010

animal testing

Yet again, I was stumbling through the world wide web and came across a really neat beauty blog called beauty fool. The specific post I stumbled upon was about animal testing. I don't know about you, but I have a lot of Vegan and Vegetarian friends. Although I'm not one myself, I try to be aware of how companies of products I use treat animals. I was shocked to find out that multiple brands I regularly use are in the left column of the chart below.

Now, I'm not about to throw out any such products. My philosophy is that I've already supported the company by purchasing the product. I'm not doing anything else for them by simply using it. HOWEVER, and this is a big however, I will no longer consciously buy products from these brands, nor will I promote them on this blog. Similarly, I would hope that I am forgiven, but made aware, if I ever do promote any of the brands to the left.

OK, now that I'm done rambling, take a look at this chart.


I think I'm most disappointed that Neutragena tests on animals.
It's one of the few drug store brands that is non-comedogenic.

That's all for now. Stay beautiful!

buxom lashliner


buxom lashliner
in suede
@sephora - 15.00

I've had my eye on this gel liner for some time now, and finally used a 15% off code with Sephora to get it, along with a few other items. I don't know what my recent obsession with my eyelashes is all about, because mine aren't horrible or anything, but this is now my second lash enhancing product in less than two months. Anyhow, Buxom Lashes, by Bare Escentuals, promises a long wearing, smear proof liner that enhances and conditions eyelashes.

So far, it's kept all its promises. My lashes seem much healthier, with or without mascara, and the liner stays on all day without a single smudge. I have even used it as a base or similarly to shadow. I'm well aware that my data is slightly skewed because I am also using an eyelash enhancing mascara. However, both the Buxom Lashliner and Revlon Grow Luscious Lashes mascara are great products without their additional benefits.

that's all for now. stay beautiful!

satin eyes


how to get this look

step one:
load a medium amount of brown gel liner onto a flat brush.
lay the brush flat against lid with the end pointed up
and the bristles pressed along the lash line.
starting at the outside corner, press brush onto lid and
wiggle upwards, half way to crease.
do this until lash line is covered. this will look messy,
but no need to worry, yet!
step two:
use middle or ring finger to blend liner towards
your crease, even out pigment, and soften edges.
still, don't worry about perfection, we'll get there!
step three:
**this next step can be done with either a flat or fluffy brush.**
first use a clean brush to blend out the liner even more.
the more you blend, the lighter the look will be.
step four:
in a circular buffing motion, apply a plummy brown
with a rounded crease brush to the edges of the gel liner along
the outside of your eye and halfway along the lash line.
many people refer to this as making a "c" or "v" in your outer corner.
step five:
take any lighter, more shimmery shadow (I blended
the second and third color below) and apply it to the inner corner.
make sure to blend the shadow slightly along your
lower lash line, into crease, and onto lid.
do not apply additional shadow to brush or the
gradation from the outside to inside lid will be too extreme.
**use your makeup wedge to clean up any messy ages**
step six:
with a fluffy brush, apply a shadow similar to your skin along the outer
edges of the look including just beneath brow and beneath the eye.
step seven:
mascara and done!


that's all for now! stay beautiful!

25% off laura mercier


Discounted makeup, who doesn't love THAT?!
I highly suggest signing up with their reward program,
because you get cool emails about even MORE discounts!
This one, for instance, is an additional 25% off a high quality brand.

Saturday, August 21, 2010

busy bee

Hi friends!

Sorry I haven't posted in quite some time. I moved back up to school last weekend and started student teaching on Monday. I promise that I haven't forgotten about you all!

Things to come:
- what's in my (makeup) bag
- an everyday look series
- halloween looks (PLEASE PUT IN YOUR REQUESTS!)
- VIDEOS!!

If there is anything else you want to see, please email brokeandbeautifulblog@yahoo.com or comment below!

20% off!


Friday, August 13, 2010

BOO!

Any HALLOWEEN makeup requests?
Write them below in a comment.

I'd like to do a small handful of them,
so let me know what you'd like to see!

stila one step makeup review


packaging


bottle and pump top


- review -

I watched a youtube review (as shown at bottom of post) about this foundation from one of my favorite gurus, xsparkage, and was really curious to try it out. HOWEVER, this little 1 fl. oz. bottle costs a whopping 44.00 at Sephora. I'm sorry, but I'm not typically one to spend nearly 50.00 on any kind of makeup, especially only 1 fl. oz. of it! Yet, as you can see, I am in possession of this ridiculously overpriced face makeup. How did this happen? Allow me to tell you a story my friend.

As you may already know, I was on the east coast visiting family this summer. I got to talking to my aunt about Sephora and makeup, and she randomly mentions that she has a 50.00 Sephora gift card that she doesn't plan to use, and proceeded to give it to me. YAY! Free makeup money! If you've purchased from Sephora online before, then you know they give you 3 free samples with each order. This time, one of my 3 samples was Stila's One Step Makeup. I tried it two days in a row and fell in love!


8:00am


6:00pm


- end of day -

It seems that only my laugh lines, which are always a problem for me, and a few blemishes are slightly showing through after 10 hours of wear and tear. Another common problem for me is shiny, oily skin by the end of the day. As you can see in the above pictures, I didn't have this problem with One Step. Although my skin wasn't as matte and dry as it had been at the beginning of the day, it was light years from it's usual end of the day shine.


PROS:
smooth
light
full coverage
lasts all day
don't need much
soft

CONS:
small
expensive

xsparkage's youtube review:

Wednesday, August 11, 2010

glitter review update.

NYX Gliterati Glitter Cream Palette


I got this palette about a month ago from www.cherryculture.com along with various other products. Check out my original blog post to see the other items I purchased. Anyhow, back to the topic at hand. I'm sad to say that I am very disappointed. I attempted to use some of these glitters during my rainbow series and they failed miserably. First I attempted to overlay a dark blue glitter over a blue shadow. Not only was there very little color or glitter pay off on my skin, but the cream made the shadow separate and smudge. Next I tried applying the glitter cream directly to my lip without shadow beneath. Although this went slightly more smoothly, it was very far from what I was expecting. Again, the cream left very little color pay off on my lid and there was even less glitter. In addition, it felt very moist and like it would take quite some time to dry. Despite these facts, I am not giving up quite so easily. I do feel that this palette will come in handy some day, it's just figuring out how to make the colors work well. One possibility is to use the glitter cream as an accent over liner or designs around the eye for occasions such as Halloween.

Alrighty, that's all for now my loves!

Tuesday, August 10, 2010

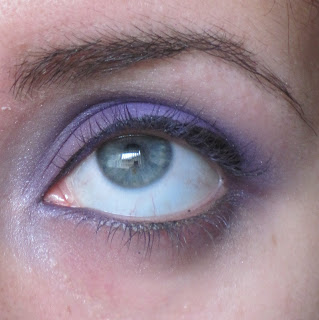
passionate purple!

......
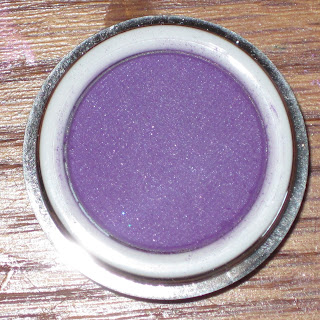
*Colors in this tutorial are trivial. They simply need to be of the same color, different shades,
and same finish. I will simply describe the technique to achieve a similar look.


[how to get this look]

step one:
Prime entire lid with Too Face Shadow Insurance.
Fill the center third of of lid to crease to the
NYX jumbo eye pencil in Milk. Soften with finger.
step two:
Cover NYX Milk with a light matte purple using a flat brush.
step three:
With a short shadow brush or round crease brush, apply
a matte purple darker than the previous on both sides
of the light purple. Without adding any more color to brush,
use a windshield wiper motion to blend color into crease.
step four:
Still using the same brush, lightly pat and blend edges
between the two purples to get rid of the harsh line.
step five:
Again using the same brush, pick up a small amount of a
pearly white with a light gold duo chrome (purple and
gold go very well together). Blend this white around
entire outer edge of shadow and below eye.
step six:
Tight line upper lash line and water line
with a black soft eye pencil.
step seven:
Mascara and done!


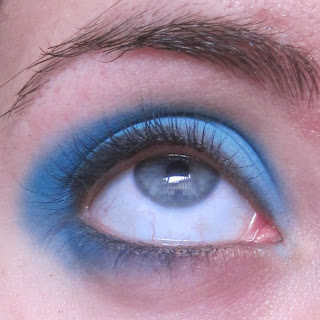
bright blue skeyes.


[how to get this look]

step one:
Prime eyelid up the the crease with NYX jumbo
eye pencil in Milk. Soften and blend with finger.
step three:
Saturate eyelid, without going into the crease,
with a light matte turquoise.
step four:
With a short smudge brush, apply a darker matte turquoise in a large
"c" shape around outter crease and slightly onto the lower lash line.
Drag color along crease to the inner corner. Shadow should be lighter
at the inner most part of eyelid.
step five:
Line upper lash line with a black soft eyeliner pencil.
step six:
Mascara and done!

...