MissChievous Myth and Legend Contest Entry
Good morrow me lords and ladies, today I bring'th you a fine makeup look inspired by the breath of the most devilish of creatures: the DRAGON! Ok, so writing this way was hard enough, enough of the medieval speak and back to business. MissChievous, one of my favorite youtube makeup gurus, is holding a contest and I have decided to enter. This is my FIRST contest on youtube submitting a look. It's not one of my best, and I don't expect to win, but why not, right? So, she basically asked people to create a look to the theme "myth and legend", but if you want to know the full contest rules, look here for her blog post or here for her video post. Anyhow, don't make fun of me, this is SOOOO out of my realm, I hope you kinda sorta like it even just a little.

my inspiration


how to get this look
step one:
prime eye from lash line to beneath eye brows, past the
outer corner of eye about 1 inch, and along lower lash line.
step two:
cover the inner corner and inner half of lid (below crease) with
NYX jumbo eye pencil in Milk. pat with finger to soften and blend.
step three:
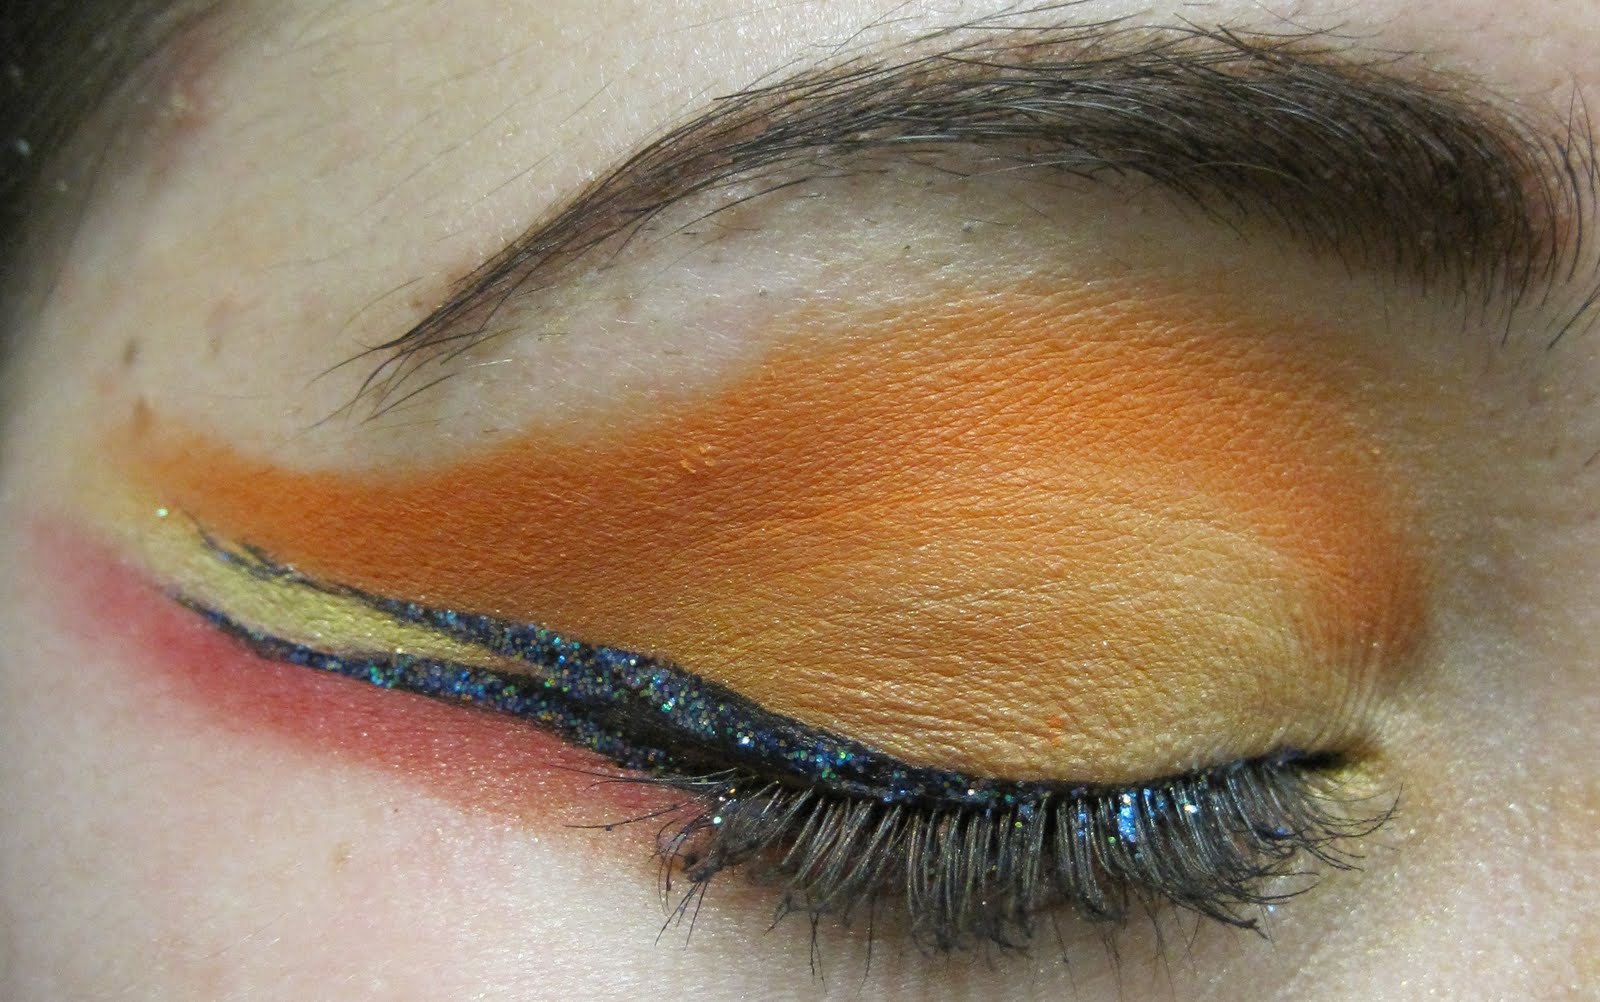
from the inner to outer corner, color should increase in darkness and intensity
starting with a bright white, to a light yellow, followed by a light orange,
and finally a medium orange. to make a smooth gradient, first pat shadows
onto lid in even sections. then pat and blend seems with a clean flat brush.
step four:
with a large angled brush, apply an even darker orange than previously used
into the crease. please the brush, holding it vertically, in crease at the inner
most part, now drag the brush to the outer corner.
step five:
reapply the same shadow onto brush and place brush in the middle of the
crease. your brush should be laying flat on your skin with the handle point
upwards and the longer end pointing inwards. drag the brush along crease
line, turning the brush upward as you approach the outer corner. finally, pull
the brush straight out to make the exaggerated cat eye. *you want this color to
be deep and opaque, so reapply shadow to brush as frequently as necessary.
step six:
with the same angled brush you just used to apply the orange to the crease,
draw a line of red from the middle of your lower lash line to the same point
as the orange cat eye. make sure there is space between the orange and red,
which will happen naturally if both the orange and red extend horizontally straight.
step seven:
fill in space between the red and orange shadow with a white eyeliner.
pat with finger to soften, but make sure it does not blend into either shadow.
step eight:
with either a flat brush or large angled brush, apply a bright white over liner.
step nine:
line upper lash line with a black liquid liner. extend liner past corner, following
the line between the white and orange. make a second line between the white and red.
step ten:
fill water line with either a black or navy blue pencil.
step eleven:
cover liquid liner with an iridescent glitter liner.
step twelve:
mascara, or false lashes, and done!
Wow, I think those were the most difficult instructions to write, and I know they are nowhere near perfect! I also chose not to include swatches of the shadows I used because the specific colors are unimportant as long as you have the right variety of shades. If you have ANY questions, please don't hesitate to ask in a comment or email brokeandbeautifulblog@yahoo.com
That's all for now. Stay beautiful!

my inspiration


how to get this look
step one:
prime eye from lash line to beneath eye brows, past the
outer corner of eye about 1 inch, and along lower lash line.
step two:
cover the inner corner and inner half of lid (below crease) with
NYX jumbo eye pencil in Milk. pat with finger to soften and blend.
step three:
from the inner to outer corner, color should increase in darkness and intensity
starting with a bright white, to a light yellow, followed by a light orange,
and finally a medium orange. to make a smooth gradient, first pat shadows
onto lid in even sections. then pat and blend seems with a clean flat brush.
step four:
with a large angled brush, apply an even darker orange than previously used
into the crease. please the brush, holding it vertically, in crease at the inner
most part, now drag the brush to the outer corner.
step five:
reapply the same shadow onto brush and place brush in the middle of the
crease. your brush should be laying flat on your skin with the handle point
upwards and the longer end pointing inwards. drag the brush along crease
line, turning the brush upward as you approach the outer corner. finally, pull
the brush straight out to make the exaggerated cat eye. *you want this color to
be deep and opaque, so reapply shadow to brush as frequently as necessary.
step six:
with the same angled brush you just used to apply the orange to the crease,
draw a line of red from the middle of your lower lash line to the same point
as the orange cat eye. make sure there is space between the orange and red,
which will happen naturally if both the orange and red extend horizontally straight.
step seven:
fill in space between the red and orange shadow with a white eyeliner.
pat with finger to soften, but make sure it does not blend into either shadow.
step eight:
with either a flat brush or large angled brush, apply a bright white over liner.
step nine:
line upper lash line with a black liquid liner. extend liner past corner, following
the line between the white and orange. make a second line between the white and red.
step ten:
fill water line with either a black or navy blue pencil.
step eleven:
cover liquid liner with an iridescent glitter liner.
step twelve:
mascara, or false lashes, and done!
Wow, I think those were the most difficult instructions to write, and I know they are nowhere near perfect! I also chose not to include swatches of the shadows I used because the specific colors are unimportant as long as you have the right variety of shades. If you have ANY questions, please don't hesitate to ask in a comment or email brokeandbeautifulblog@yahoo.com
That's all for now. Stay beautiful!
No comments:
Post a Comment